]]>
Multiple Menu Files
You can have multiple Menu Files on the Food & Beverage Point of Sale (Red Buttons) in order to split different products, e.g. Food and Beverage, Lunch Menu and Dinner Menu etc.
These are created by linking the Menu File to the Preset File (Green Buttons).
Stage 1 – Create Menu Files
From the Main Menu select Sales Item Routines.
Select Amend Menu File and then Create/Amend/Delete Menus. You will then be displayed with a filter screen.
Enter a name for the Menu File you wish to create, e.g. BEVERAGE (maximum of 10 characters) and press Enter.
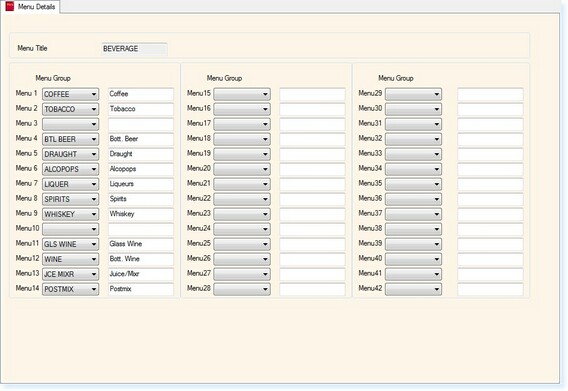
The following screen will be displayed in order to select the groups of products from the drop-down lists that you want to appear in the Menu File, e.g. Beverage Menu Groups. (Note – you can only use up to Menu 26 as there are 26 Red Buttons available on your Point of Sale)

– Menu File –
Once you have selected the groups of products, the blank fields next to the drop-down boxes allow you to enter a 10 character description that you want to see on the Red Group Button on the Point of Sale. If the field is left blank, the description will default to the Group Name in the drop-down box.
Once you have created your menu file, select F2 Exit and you will return to the Menu Look-up Screen.
You can then continue to create additional menu files.
(NOTE – DO NOT DELETE ANY MENU FILES WHICH ARE CURRENTLY IN YOUR FOOD & BEVERAGE SYSTEM!)
Stage 2 – Creating Preset Files
From the Main Menu select Sales Item Routines.
Select Amend Preset File and then Create/Amend/Delete Presets. You will then be displayed with a filter screen.
Enter a name for the Preset File you wish to create, e.g. BEVERAGE (maximum of 10 characters) and press Enter.
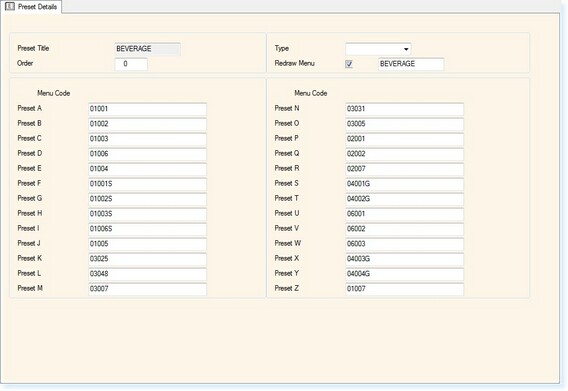
The following screen will be displayed in order create the link between the menu and preset file.

– Preset File –
The Preset Name will be displayed at the top of the screen.
In the order field, you can define the order in which the presets are displayed on the Point of Sale using the numbers 1 to 9.
To the right of the screen is a tickbox labelled Redraw Menu. To link the preset to a menu file, select this box as above and in the field next to it type in the name of the Menu File which you created in Stage 1. (You can select F1 Help whilst in the field to be able to select the Menu File from the list)
The Preset A through to Preset Z can then be populated with the quick selling items within that group of products by typing in the Sales Item Menu Code / PLU Number into relevant fields.
Once you have created your preset file, select F2 Exit and you will return to the Preset Look-up Screen.
You can then continue to create additional preset files.
You can have a maximum of 9 presets on a Point of Sale Terminal.
(NOTE – DO NOT DELETE ANY PRESET FILES WHICH ARE CURRENTLY IN YOUR FOOD & BEVERAGE SYSTEM!)
Stage 3 – Operating the Multiple Menu Files
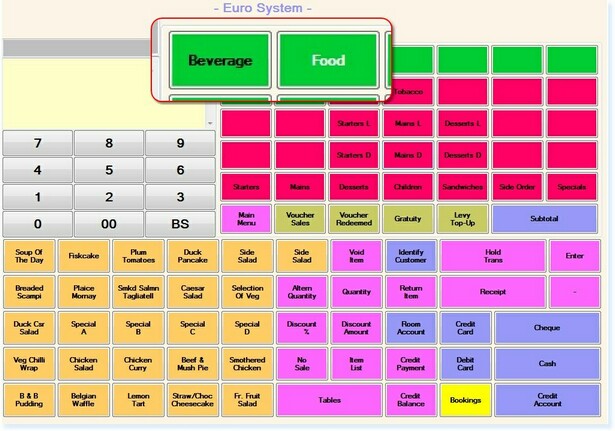
From the Point of Sale Screen the presets which have been created will be displayed on the Green Preset Buttons at the top of the screen, as shown below.

– Point of Sale –
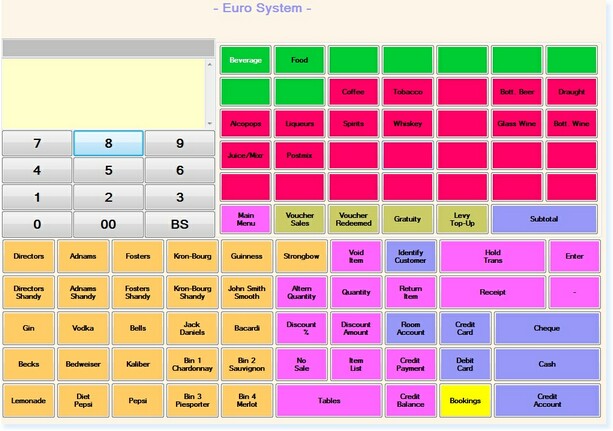
When you select one of the Presets, e.g. Beverage, the options in the Red Group Buttons will change to show the relevant Menu File, as below.

– Point of Sale –


