]]>
Maintain Analysis Codes
Analysis codes are an extremely important part of the system. In essence ‘Analysis Codes’ route all of the revenue generated in the system, to a correct final destination, on the financial reports produced by the system.

Above shows the data flow creation when a new ‘Product’ is created in Elite, products range across the system, however, a few examples include:
Administration System:
A Subscription Code
Retail System:
A Squash Racquet
A Squash Court
Food & Beverage System:
A Bottle of Wine
Each item ‘Product’ must be linked to a ‘Group’, which subsequently links to an ‘X-Heading’. There can in theory be an infinite number of groups, whereas the ‘X-Headings’ are limited to a maximum of ten, which are predefined within the system.
Once a specific product has been linked to a specific group, and then linked to a specific x-heading, a number of ‘Analysis Codes’ are generated for each specific product, these exist within the Analysis Code File.
For every ‘Group’ within the system, there will be four main ‘Analysis Codes’, these are:
Sale:
The ‘Product’ value at Retail
Cost of Sale:
The Value to Produce the Retail ‘Product’
Discount:
Any applicable Discount value, pre-specified within the ‘Group’ file
Inventory:
All Stock Items value
Each ‘Analysis Code’ needs to be ‘Pointed’ to a ‘Line’ on the ‘Weekly Sales Report’, or else it will be ‘Undefined’. An ‘undefined’ code will by it’s very nature not fit a revenue group and therefore remain ‘unaccounted’ for from an accounting perspective.
‘Undefined’ codes will only be generated the first time a sale is made against a ‘Specific Group’ which has been newly created. Once sold for the first time the four codes will be generated, and appear in the ‘Undefined’ area at the top of the weekly sales report.
To ‘Point’ these codes to the correct ‘Line’ please follow the following procedure:
From the ‘Main Menu’ of the Administration System select ‘Amend Tables’. This will display the following menu.

Select Maintain Analysis Codes. The following menu will be displayed.

Select Create/Amend/Delete Analysis Codes. You will then see the ‘Filter Screen’.
Select F1 – Help, followed by F8 – Undef
![]()
![]()
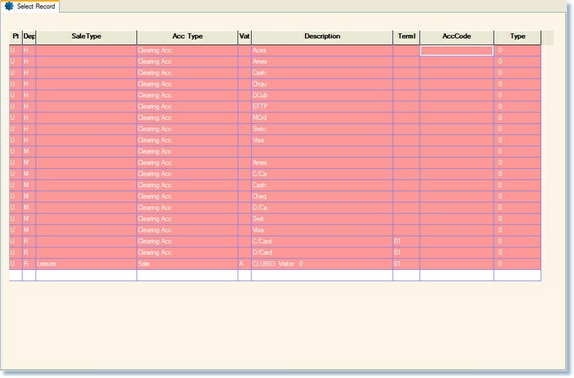
This will then display a list similar to the one below to show the items which are currently undefined.

Column Definitions
Pt
U = Undefined
D = Defined
Dep
A or M = Administration / Membership System
F = Food & Beverage System
R = Retail/Booking System
H = Hotel System
L = Leisure System
S = Spa System
Sale Type
M = Fee
U = Fees Due
E = Cash Pay
C = Cash Receipts
S = Sundries
P = Packages
B = Merchandise
D = Discount
A = Deposit
L = Leisure
Y = Levy
R = Range Dispense
T = Range Expiry
Acc Type
S = Sales
C = Cost of Sales
D = Discount
V = VAT
I = Inventory
L = Clearing Accounts
T = Control Accounts
Vat
VAT Code relevant to items
e.g. A = Standard VAT Rate, E or X = Exempt, Z = Zero-rated.
Description
Description of Product Group, Activity, Subscription Code
Terml
Sales Area in which Terminal Exists
e.g. 1 = Restaurant, 2 = Bar I, 3 = Bar II, etc.
AccCode
If an Accounts Interface is being installed, this column would be used to defined the External Accounts Codes.
Type
The Weekly Sales Report line where you wish the revenue to be reported.
Every code type, as mentioned earlier, will appear as an individual line within the Undefined records screen. Those which are not pointed will appear in ‘Red’, once pointed the colour will refresh to ‘Blue’.
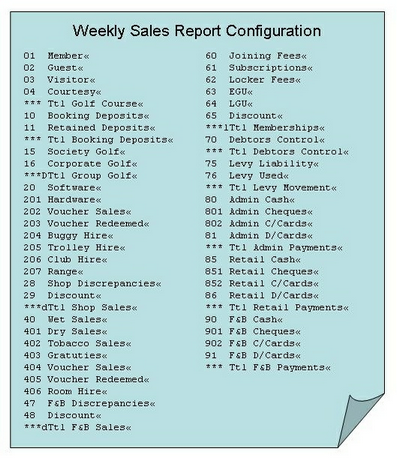
The weekly sales report is constructed on a tabular format, from line ‘1’ to a possible maximum of ‘999’. An example is shown below:

Pointing Individual Codes
From the undefined screen shown above click in the ‘Type’ column, type the line reference number from your Weekly Sales report to which you wish to point the specific revenue. Alternatively if you do not know the line reference number, simply select the ‘F1-Help’ function to view a list of possible options, listed in numerical order, select the required line from the list, and ‘F3-Accept’ to continue.
This method is ample, if only a few new codes have been created, however, bearing in that four analysis codes are formed for each individual product entity, you may decide to use the process of Pointing Groups of Codes, together.
Pointing Groups of Codes
If you create a new menu, which is subsequently loaded onto the system, four analysis codes will be created for each item, each of which is required to be pointed to the same relevant line on the ‘Weekly Sales Report’.
From the initial filter screen shown below select the ‘F1-Help’ function.

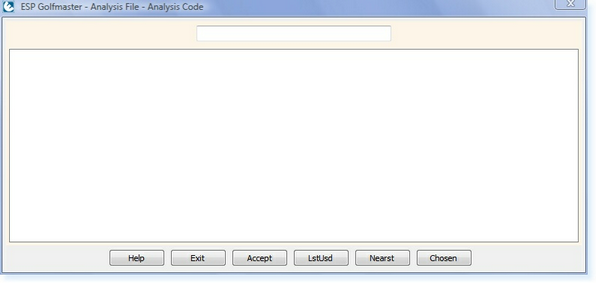
Upon selecting ‘F1-Help’, the following window will appear:

Select the ‘F7-Choose’ function which opens a familiar ‘Choose & Print’ style selection window, shown below:

The simplest selection technique is to use ‘The Same As’, although as you become more confident you may consider, making more complex, and detailed selections, by using a multiply of queries, against a single data source.
More about using the ‘Choose’ function
Once you have ‘Select Records’ which you decide to point together, for example all ‘WET’ items for the bar, or all ‘JUMPERS’ for the shop, in general times these can be selected by Revenue ‘Group’.
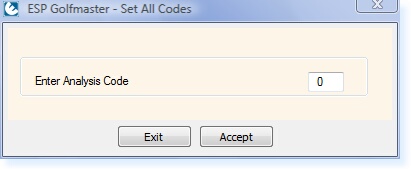
Your selection will be highlighted, use the ‘F8-SetCde’ function from the function bar to point the selection to the correct line. The screen below will be displayed.

Type the line code to which you wish to point the selection of analysis codes and select ‘F3-Accept’, the action will complete and refresh the colour of the undefined codes to appear in pale blue, indicating that they are now allocated to a line on the ‘Weekly Sales Report’, repeat until all red lined coded have been allocated.
Please be aware that the application will rely upon your direction, and therefore, although the revenue will report to your chosen line, it may not be the correct line, in which case, if upon viewing the report the payments, to the revenue, do not balance, you may need to re-evaluate the line numbers to which the revenue has been allotted.


